Converting your Pop – Up Camper to Solar
‘A General Guide’
About 6 months ago, my wife and I wanted to install a solar powered system to our Coleman Pop Up camper… Call it a ‘trib-trooper’ experiment for ‘end times’. Little did I know what I was about to get myself into as there was not much on the internet on how to convert a Pop Up camper to solar. I already knew that our Coleman power converter box could run off of electric and also off of a battery so I wanted to find heavy duty AGM batteries with high amp hours (ah) to run solar off of a 12 volt system. At atbatt.com http://www.atbatt.com/product/25123/sla/amstron/6v-210ah/battery I bought (2) 6 Volt batteries and then connected them in a series to convert them to 12 Volt. Each battery cost $225.00, so $450 for both and Free shipping (each battery is 68 lbs)!!
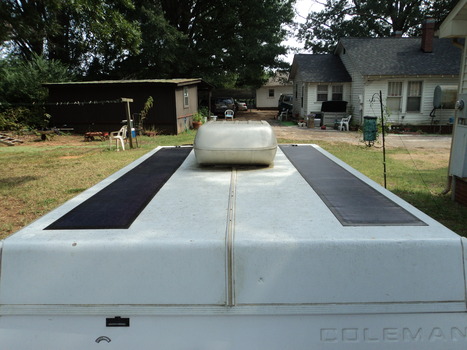
I searched online for solar panels and came up with a brand called ‘Uni-Solar’, a solar laminate that has a 20 year warranty. I purchased (2) Solar laminates which cost $330.00. Each laminate is approx. 16” Wide x 112” Length and has an adhesive sealant with a microbial inhibitor. The exact specifications can be found here: http://www.soldonsun.com/files/UNI-PVL68.pdf These (2) solar panels fit perfectly on top of our Pop Up camper and provide a maximum of 136 Watts of Power in full sun.
Once I understood that the amount of space I had limited me to 136 Watts of solar power, I looked for a solar charge controller that could efficiently charge our AGM batteries. Again, I went to the Soldonsun website and bought a Pro-Star 15 solar charge controller for $84.00. The one I bought will handle up to 15 Amps. On a 12 volt system, you divide the Watts by the Voltage to get your Amps. Watts/Volts = Amps… So 136 Watts divided by 12 Volts gives me around 11 Amps. The exact specifications can be found here: http://www.soldonsun.com/files/ProStar.pdf (this is for 15 Amp or 30 Amp controllers). The nice thing about the ProStar-15 controller is that it provides longer battery life and improved system performance and has many safety and electronic protections- not to mention it also has an estimated 15 year life.
You will need to also buy (2) 30 or 50 feet (depending on how far away the panels are from the charger) MC3 Cable, 600 VDC, 10 AWG to connect the panels to the charger. (2) 50’ cables will cost around $75 - $100.
For safety reasons, I recommend going to Lowes or Home Depot and buying a 15 Amp circuit breaker box. The breaker and box should run around $20… a small investment to protect your system. In the following picture I will try and show how I wired the panels to the breaker and charge controller and also how I wired the Pop Up camper battery wires into the solar power system. On a separate note, we purchased a 1000 watt inverter (from Northern Tool) that we hook directly to the AGM battery terminals for appliances that run at a higher wattage.
15 Amp Square D Circuit Breaker 1000 Watt Inverter Charge Controller
Mini Junction Box Power switch from Solar to Pop up
Converter box (optional)
Looking at the picture above, the wires from the solar panels feed into the mini junction box where they are combined (4 wires) to feed into the circuit breaker as 2 wires (pos & neg). (A good website for this: http://freesunpower.com/project2.php )Behind the mini junction box are the 2 wires that feed from the converter already installed with the Pop Up camper (white and black wire). These 2 wires connect into the ‘load’ side of the charge controller. I installed an on/off switch (optional) as an added safety feature. The 2 wires that feed into the circuit breaker eventually connect into the ‘solar’ ports on the charge controller. From the charge controller, connect the batteries to the ‘battery’ port and your system is set-up. Additionally, one should invest in an inverter to handle higher wattage loads. We bought a 1000 Watt inverter from Northern Tool. The nice thing about the inverter is that it has a wattage display and real time information like battery life. I recommend buying 300 AMP 2 Gauge wires to connect the inverter directly to the batteries.
I installed a power strip that plugs into the AC side of the inverter to run multiple appliances. Also installed brackets to keep the batteries stable during traveling.
The system is now hidden and the area transformed into another bench to sit on. The last thing installed was a voltage gauge so we can see if the batteries are still OK without having to pop up the camper. We originally bought a digital one from China but it lasted only a week, so we went to Autozone and bought one for a vehicle. It’s not the best gauge to use but it gives us a round about idea where the battery voltage is.
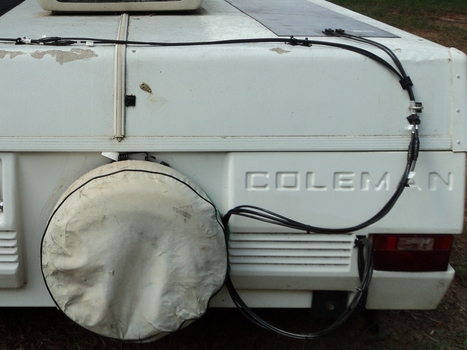
Lastly, when traveling you will want to keep the wires secured. When the camper is folded down, there is 5 feet of slack in the wires. An easy way to keep them off the ground is to bungee them to the spare tire. A hook can be installed to keep the wires from moving around.
Overall, the total
cost for this system is about $1,300.00 Questions? Contact
returnoftheremnant@gmail.com
‘A General Guide’
About 6 months ago, my wife and I wanted to install a solar powered system to our Coleman Pop Up camper… Call it a ‘trib-trooper’ experiment for ‘end times’. Little did I know what I was about to get myself into as there was not much on the internet on how to convert a Pop Up camper to solar. I already knew that our Coleman power converter box could run off of electric and also off of a battery so I wanted to find heavy duty AGM batteries with high amp hours (ah) to run solar off of a 12 volt system. At atbatt.com http://www.atbatt.com/product/25123/sla/amstron/6v-210ah/battery I bought (2) 6 Volt batteries and then connected them in a series to convert them to 12 Volt. Each battery cost $225.00, so $450 for both and Free shipping (each battery is 68 lbs)!!
I searched online for solar panels and came up with a brand called ‘Uni-Solar’, a solar laminate that has a 20 year warranty. I purchased (2) Solar laminates which cost $330.00. Each laminate is approx. 16” Wide x 112” Length and has an adhesive sealant with a microbial inhibitor. The exact specifications can be found here: http://www.soldonsun.com/files/UNI-PVL68.pdf These (2) solar panels fit perfectly on top of our Pop Up camper and provide a maximum of 136 Watts of Power in full sun.
Once I understood that the amount of space I had limited me to 136 Watts of solar power, I looked for a solar charge controller that could efficiently charge our AGM batteries. Again, I went to the Soldonsun website and bought a Pro-Star 15 solar charge controller for $84.00. The one I bought will handle up to 15 Amps. On a 12 volt system, you divide the Watts by the Voltage to get your Amps. Watts/Volts = Amps… So 136 Watts divided by 12 Volts gives me around 11 Amps. The exact specifications can be found here: http://www.soldonsun.com/files/ProStar.pdf (this is for 15 Amp or 30 Amp controllers). The nice thing about the ProStar-15 controller is that it provides longer battery life and improved system performance and has many safety and electronic protections- not to mention it also has an estimated 15 year life.
You will need to also buy (2) 30 or 50 feet (depending on how far away the panels are from the charger) MC3 Cable, 600 VDC, 10 AWG to connect the panels to the charger. (2) 50’ cables will cost around $75 - $100.
For safety reasons, I recommend going to Lowes or Home Depot and buying a 15 Amp circuit breaker box. The breaker and box should run around $20… a small investment to protect your system. In the following picture I will try and show how I wired the panels to the breaker and charge controller and also how I wired the Pop Up camper battery wires into the solar power system. On a separate note, we purchased a 1000 watt inverter (from Northern Tool) that we hook directly to the AGM battery terminals for appliances that run at a higher wattage.
15 Amp Square D Circuit Breaker 1000 Watt Inverter Charge Controller
Mini Junction Box Power switch from Solar to Pop up
Converter box (optional)
Looking at the picture above, the wires from the solar panels feed into the mini junction box where they are combined (4 wires) to feed into the circuit breaker as 2 wires (pos & neg). (A good website for this: http://freesunpower.com/project2.php )Behind the mini junction box are the 2 wires that feed from the converter already installed with the Pop Up camper (white and black wire). These 2 wires connect into the ‘load’ side of the charge controller. I installed an on/off switch (optional) as an added safety feature. The 2 wires that feed into the circuit breaker eventually connect into the ‘solar’ ports on the charge controller. From the charge controller, connect the batteries to the ‘battery’ port and your system is set-up. Additionally, one should invest in an inverter to handle higher wattage loads. We bought a 1000 Watt inverter from Northern Tool. The nice thing about the inverter is that it has a wattage display and real time information like battery life. I recommend buying 300 AMP 2 Gauge wires to connect the inverter directly to the batteries.
I installed a power strip that plugs into the AC side of the inverter to run multiple appliances. Also installed brackets to keep the batteries stable during traveling.
The system is now hidden and the area transformed into another bench to sit on. The last thing installed was a voltage gauge so we can see if the batteries are still OK without having to pop up the camper. We originally bought a digital one from China but it lasted only a week, so we went to Autozone and bought one for a vehicle. It’s not the best gauge to use but it gives us a round about idea where the battery voltage is.
Lastly, when traveling you will want to keep the wires secured. When the camper is folded down, there is 5 feet of slack in the wires. An easy way to keep them off the ground is to bungee them to the spare tire. A hook can be installed to keep the wires from moving around.
Overall, the total
cost for this system is about $1,300.00 Questions? Contact
returnoftheremnant@gmail.com